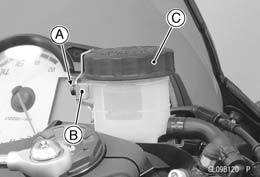
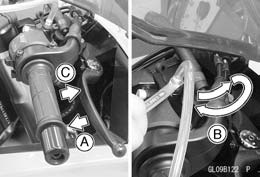
- Remove:
Screw [A] from the Metal Retainer Clip [B]
Metal Retainer Clip [B]
Front Brake Reservoir Cap [C]
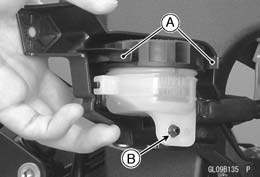
- Remove:
Bolt [A]
Cover [B]
- Pull the cover out from the grommet [C]

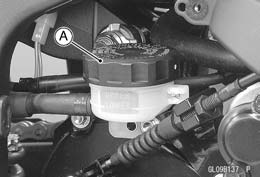
- Release the clamps [A] and projection [B] of the cover from the rear brake reservoir.
- Remove the rear brake reservoir cap [A].
- Remove the Diaphragm Plate and Diaphragm.
- Fill the reservoir with fresh brake fluid to the upper level line in the reservoir.
- Slowly pump the brake lever several times until no air bubbles can be seen rising up through the fluid from the holes at the bottom of the reservoir.
- Remove the rubber cap [A] from the bleed valve on the front master cylinder.
- Attach a clear plastic hose [B] to the bleed valve, and run the other end of the hose into a container.
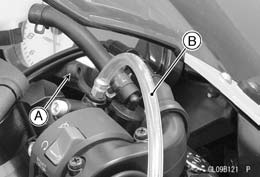
- Bleed the brake line and the master cylinder (repeat this operation until no more air can be seen coming out into the plastic hose):
- Pump the brake lever until in becomes hard, and apply the brake and hold it [A].
- Quickly open and close [B] the bleed valve while holding the brake applied.
- Release the brake [C].
Note:
- The fluid level must be checked often during the bleeding operation and replenished with fresh brake fluid as necessary. If the fluid in the reservoir runs completely out any time during bleeding, the bleeding operation must be done over again from the beginning since air will have entered the line.
- Remove the clear plastic hose.
- Tighten the bleed valve, and install the rubber cap.
Torque - Front Master Cylinder Bleed Vavle: 5.4 N·m (0.55 kgf·m, 48 in·lb)
- Remove the rubber cap [A] from the bleed vavle on the caliper.
- Attache a clear plastic hose [B] to the bleed vavle, and run the other end of the hose into a container.
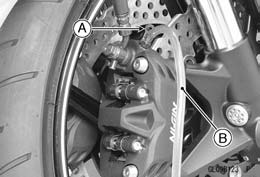
- Bleed the brake line and the caliper (repeat this operation until no more air can be seen coming out into the plastic hose):
- Pump the brake lever until it becomes hard, and apply the brake and hold it [A].
- Quickly open and close [B] the bleed vavle while holding the brake applied.
- Release the brake [C].
Note:
- The fluid level must be checked often during the bleeding operation and replenished with fresh brake fluid as necessary. If the fluid in the reservoir runs completely out any time during bleeding, the bleeding operation must be done over again from the beginning since air will have entered the line.
- Tap the brake hose lightly from the caliper to the reservoir for more complete bleeding.
- Front Brake: First bleed the right caliper then repeat the above steps for the left caliper.

- Remove the clear plastic hose.
- Install the Diaphragm, Diaphragm Plate, and the Front Brake Reservoir Cap.
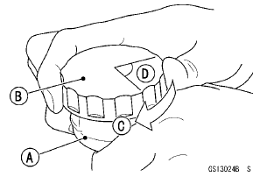
- Follow the procedure below to install the front/rear brake fluid reservoir cap correctly.
- First, tighten the brake fluid reservoir cap [B] clockwise [C] by hand until slight resistance is felt indicating that the cap is seated on the reservoir body, then tighten the cap an additional 1/6 turn [D] while holding the brake fluid reservoir body [A].
- Install the metal retaining clip and screw.
- Tighten.
Torque - Front Brake Reservoir Cap Stopper Screw: 1.2 N·m (0.12 kgf·m, 11 in·lb) - Install the rear brake reservoir to the projection and clamps of the cover.
- Insert the cover into the grommet, and install the bolt.
- Tighten the bleed vavle, and install the rubber cap. Torque - Bleed Valves: 7.8 N·m (0.80 kgf·m, 69 in·lb)
- Check the fluid level.
- After bleeding is done, check the brakes for good braking power, no brake drag, and no fluid leakage.
When working with the disc brake, observe the precautions listed below.
- Never reuse old brake fluid.
- Do not use fluid from a container that has been left unsealed or that has been open for a long time.
- Do not mix two types and brands of fluid for use in the brake. This lowers the brake fluid boiling point and could cause the brake to be ineffective. It may also cause the rubber brake parts to deteriorate.
- Don’t leave the reservoir cap off for any length of time to avoid moisture contamination of the fluid.
- Don’t change the fluid in the rain or when a strong wind is blowing.
- Except for the disc pads and disc, use only disc brake fluid, isopropyl alcohol, or ethyl alcohol for cleaning of the brake parts. Do not use any other fluid for cleaning these parts. Gasoline, engine oil, or any other petroleum distillate will cause deterioration of the rubber parts. Oil spilled on any part will be difficult to wash off completely and will eventually deteriorate the rubber used in the disc brake.
- When handling the disc pads or disc, be careful that no disc brake fluid or any oil gets on them. Clean off any fluid or oil that inadvertently gets on the pads or disc with a high-flash point solvent. Do not use one which will leave an oily residue. Replace the pads with new ones if they cannot be cleaned satisfactorily.
- Brake fluid quickly ruins painted surfaces; any spilled fluid should be completely wiped up immediately.
- If any of the brake line fittings or the bleed valve is opened at any time, the AIR MUST BE BLED FROM THE BRAKE LINE.